


Purpose
The purpose of this blog is to introduce various Kubernetes Objects available as a part of the Kubernetes API in a short and concise manner.
This blog is a continuation of my last blog where I introduced the architecture of Kubernetes here Kubernetes Architecture for Backend Developers.
I hope you find this useful
What are Kubernetes Objects?
Suggested Read: https://kubernetes.io/docs/concepts/overview/kubernetes-api/
Kubernetes gained popularity from the fact that it is designed to assist throughout the application development and release lifecycle. The Object Model is used to represent different entities and infrastructure components that persist within the cluster. These entities describe -
Applications in the cluster
Nodes where they are deployed
The attached Policies pertain to restrictions on restart/update, and when to pull images for containers. etc.
When we specify an object inside the YAML configuration files used to describe the various components of the cluster in a declarative way, we specify the intent or desired state of the cluster we want. Not just in the declarative way, but also, in the imperative way of using kubectl what we do is specify our intent directly to the kube-apiserver.
A brief Introduction to Object Properties
The Kubernetes API like any other API has an extensive list of documentation. The Objects have some properties that are passed in the JSON fields. A common structure of objects in A Kubernetes YAML manifest is given below.
Warning: There are more properties that are specific to various objects. This only gives a general idea but does not provide the full description. To know more about any object mentioned here refer to The Kubernetes API docs
apiVersion: Version #Version is replaced with version of
                                        #API Object specification to use
kind: Object #Replace Object with the Kind of kubernetes object to declare.
metadata:
    #Holds the metadata i.e. additional info helpful to the user
    name: Name-Of-Object #Specify the Name of the Object Resource
                                             #to identify uniquely in Cluster Namespace
    labels: #Labels are key-value pairs that can connect
                    #identifying metadata with Kubernetes objects.
            label1: value1
            label2: value2
            ...
spec:
    #Specifications/Intent of Container, Networking etc. resources needed
    # This Block is also known as ObjectSpec
    containers:
        - image: ImageName:ImageTag #Image of Container to pull from Registry
            name: Name-Of-Container #Name of Container
            ... #other properties for containers
... #other spec properties
How do these objects translate to real-world components?
The specified intent either through kubectl or via YAML manifests is communicated to the API Server. The API Server compares these intents and communicates them to the Control Plane. The Control Plane then creates the required Containers, Network Components, etc.
A recap of Nodes
Nodes are virtual identities assigned by Kubernetes to the systems part of the cluster - whether Virtual Machines, bare-metal, Containers, etc. These identities are unique to each system and are used by the cluster for resource accounting and monitoring purposes, which helps with workload management throughout the cluster.
Anatomy of a Node
A Node is managed by two components kube-proxy and kubelet. It holds a container runtime which is required to run all containerized workloads on the node-control plane agents and user workloads.
The kubelet and kube-proxy node agents are responsible for executing all local workload management-related tasks - interact with the runtime to run containers, monitor containers and node health, report any issues and node state to the API Server, and manage network traffic to containers.
Node identities are created and assigned during the cluster bootstrapping process by the tool responsible to initialize the cluster agents. Most distributions such as Minikube, and kind use kubeadm which is the default tool provided by Kubernetes
Node agents on Nodes
Control Plane Nodes run the API Server, Scheduler, Controller Manager, etcd, Container Runtime, kubelet, and, kube-proxy Node Agents.
Worker Nodes only run the Container Runtime, kubelet, and, kube-proxy Node Agents
Heartbeat
Heartbeats, sent by Kubernetes nodes, help your cluster determine the availability of each node, and to take action when failures are detected. (more about these in later blogs)
Namespaces
These are virtual sub-clusters within a cluster that allow the separation and isolation of objects created inside these clusters. This is ideal when multiple users share the same network in the team such as The Developers and The Operations Team etcThe names of the resources/objects created inside a Namespace are unique, but not across Namespaces in the cluster.
When a cluster starts Kubernetes creates four Namespaces out of the box: kube-system, kube-public, kube-node-lease, and default.
kube-system
This Namespace contains all the objects created by the Kubernetes System and most of them are control plane agents and add-ons enabled via the Kubernetes Distribution used such as Minikube, k3s, kind, etc.
kube-public
This is the namespace for objects created by Administrators and Developers for components that host public(non-sensitive) data. It is unsecured and readable as can be inferred from the name.
default
It is the default namespace in which all resources provisioned by Administrators and Developers when no namespace is explicitly specified.
kube-node-lease
This is the namespace that contains node lease Kubernetes Objects. These are objects that keep track of node heartbeat. They are beyond the scope of this article. I am still learning about this and will share this in later blogs.
( for more info read this Proposal: https://github.com/kubernetes/enhancements/tree/master/keps/sig-node/589-efficient-node-heartbeats)
Best Practices
It is advised to segregate your workflow into multiple namespaces to administer and develop your microservices applications easily. A good practice thus is to create new namespaces as desired, to virtualize the cluster and isolate users, developer teams, applications, or tiers.
Creating Namespaces in Kubernetes
$kubectl create namespace New-NameSpace-Name
Listing Namespaces in Kubernetes
Let us create 4 namespaces in cluster: dev, local, man, prod
$ kubectl create ns dev
namespace/dev created
$ kubectl create ns man
namespace/man created
$ kubectl create ns local
namespace/local created
$ kubectl create ns prod
namespace/prod created
Let us list these using the command
$ kubectl get ns
Output:
NAME              STATUS   AGE
kube-system       Active   2m56s
default           Active   2m56s
kube-public       Active   2m56s
kube-node-lease   Active   2m56s
dev               Active   14s
man               Active   11s
local             Active   8s
prod              Active   4s
Deleting Namespaces
$kubectl delete Namespace-Name
Pods
We briefly touched on Pods in our last blog (here). Let us detail them here.
A Pod is the smallest Kubernetes Workload Object. It is the logical collection of one or more containers enclosing and encapsulating them so that they:
They share the same resources and network namespace and share the same IP Address assigned to the Pod.
They are scheduled together as a single unit.
They share the same external storage (volumes and bind mounts) and other common dependencies
Pods are ephemeral in nature i.e. they are scheduled and die frequently after a termination period by the control plane or manually by the user. They do not run forever. They cannot self-heal in case of failure. Their replication, fault-tolerance and self-healing is managed by controllers/operators in Kubernetes such as Deployments, StatefulSets, ReplicaSets, Jobs etc.
Pod definition in YAML manifests
Below is an example of a standalone pod in Kubernetes that creates runs one NGINX container in the pod.
apiVersion: v1
kind: Pod
metadata:
    name: nginx-pod
    labels:
        run: nginx-pod
spec:
    containers:
        - name: nginx-container
            image: nginx:latest
            ports:
                - containerPort: 80
A brief explanation of the fields mentioned above:
apiVersion: We always specify v1 for Pod object definition as per the API Reference
metadata: Holds the object Annotations for Pod
name: Identify this pod with the name “nginx-pod”
labels: Additional Fields for annotations
- run: Assign a key-value pair run=”nginx-pod”
spec: This dictionary holds the data about containers, networks, volumes etc. and their configurations
containers: This list holds information of containers to run. Each item is a dictionary. Here we have created one container named “nginx-container” using the image “nginx:latest” which is pulled from a container registry such as Docker registry in this case. You may specify any other docker registries
name: Specifies name of the container
image: Image to use for the container
ports: A list of ports to expose on the container
- containerPort: This exposes a port in the container to other containers in this case PORT 80
Labels
Labels are key-value pairs attached to Kubernetes objects (e.g. Pods, ReplicaSets, Nodes, Namespaces, Persistent Volumes). Labels are used to organize and select a subset of objects, based on the requirements in place. Many objects can have the same Label(s). Labels do not provide uniqueness to objects. Controllers use Labels to logically group together decoupled objects, rather than using objects' names or IDs.
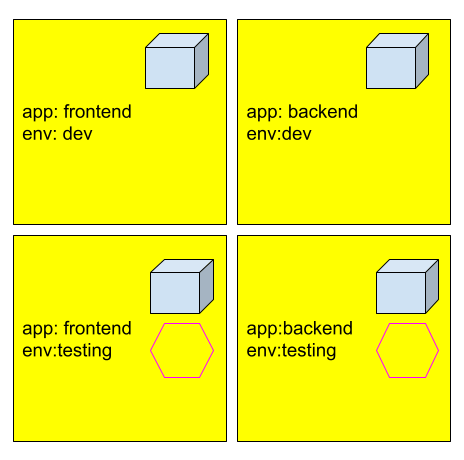
In this figure, we have 4 pods which can be grouped as follows:
app=frontend selects left 2 pods.
app=backend selects right 2 pods
env=testing selects bottom 2 pods
env=dev selects upper 2 pods
to select any one pod using combinations of labels such as app=frontend AND env=testing selects the bottom left pod
Label Selectors
Equality Based
- Equality-Based Selectors allow filtering of objects based on Label keys and values. Matching is achieved using the \=, \==(equals, used interchangeably), or !=(not equals) operators. For example,with env==dev or env=dev we are selecting the objects where the env. Label key is set to value dev.
Set Based
- Set-Based Selectors allow the filtering of objects based on a set of values. We can use in, notin operators for Label values, and exist/does not exist operators for Label keys. For example, with env in (dev,testing) we are selecting objects where the env Label is set to either dev or testing; with !app we select objects with no Label key app.
ReplicaSets
Let us introduce ourselves with the first Kubernetes Controller ReplicaSet designed to manage replication and self-healing in Kubernetes. ReplicaSet supports both set-based and equality-based Label Selectors.
An application that runs as a single instance always comes at the risk of the application crashing unexpectedly, or at times entire server hosting the application may crash resulting in a SPOF(Single Point of Failure). Also in a microservice ecosystem failure of one component may crash the other service which very much defeats the purpose of microservices in the first place. To tackle this problem we horizontally scale the application by running Replicas of our application. The lifecycle of an application that resides in the Pod is overseen by the ReplicaSet controller. In a ReplicaSet we scale the number of Pods that run a specific container image. Scaling can be accomplished manually using an autoscaler
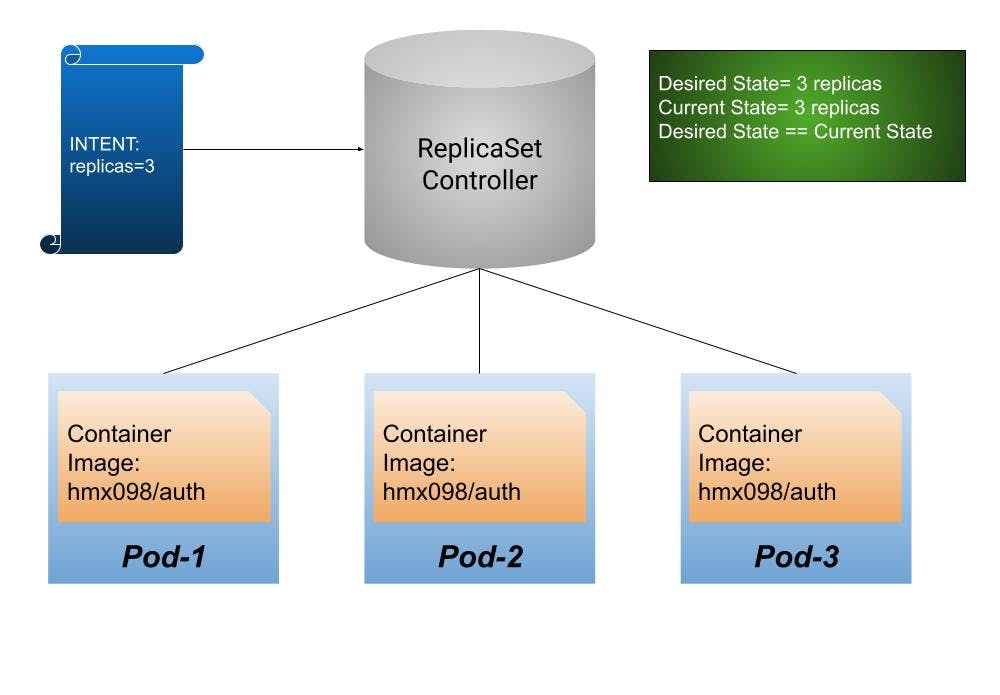
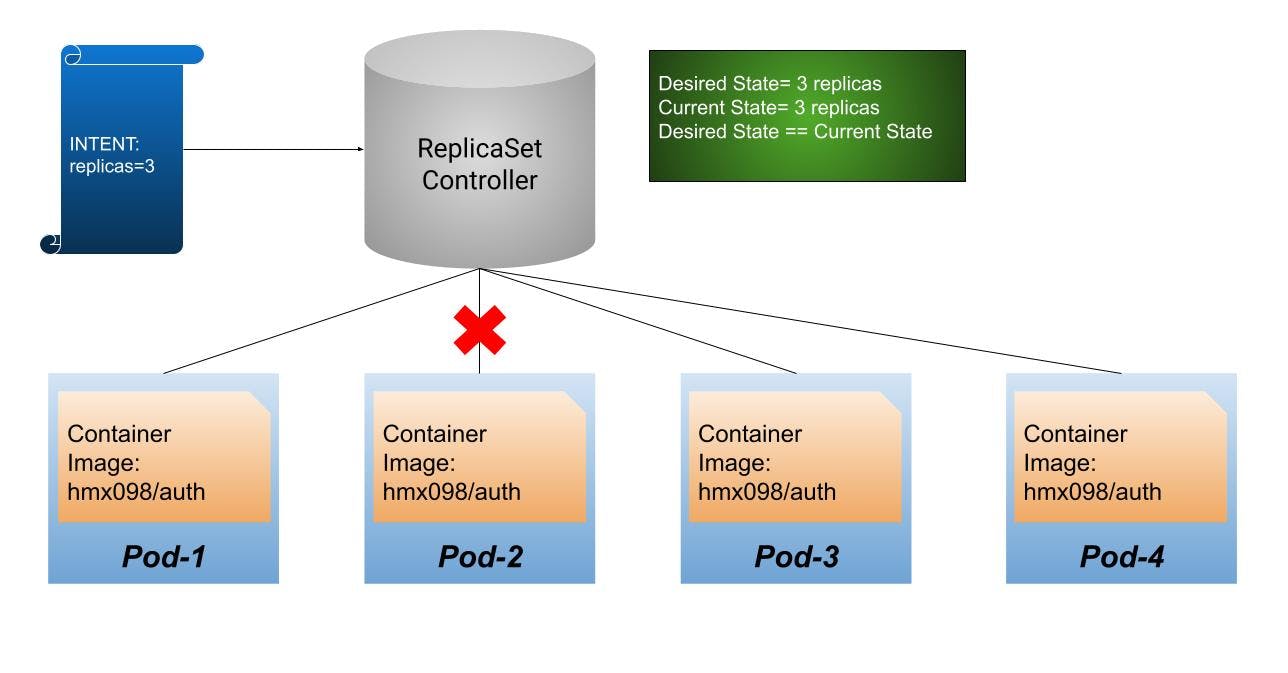
Let us visualize a scenario where we create a ReplicaSet with a replica count set to 3. Now Kubernetes spins up 3 Pods say Pod-1, Pod-2, and Pod-3 that run the same container image. Now, the desired state matches the current state. When one of the pods is destroyed Kubernetes automatically spins up another identical Pod to maintain the replica count of 3. This ensures that current state matches the desired state.
Note: Although all Pods run same container image they do not possess identical Pod name, IP Address, and the Pod object ensures that the application can be individually placed on any worker node of the cluster.
Example
Let us create a ReplicaSet with 3 instances of an Authentication microservice.
apiVersion: apps/v1
kind: ReplicaSet
metadata:
    name: auth-backend
    labels:
        app: auth
        type: flask-service
        apiType: REST

spec:
    replicas: 3
    selector:
        matchLabels:
            app: auth
    template:
        metadata:
            labels:
                app: auth
        spec:
            containers:
                - name: auth-app
                    image: hmx098/auth
Now we get 3 replicas of running the hmx098/auth image.
On Failure of a Pod
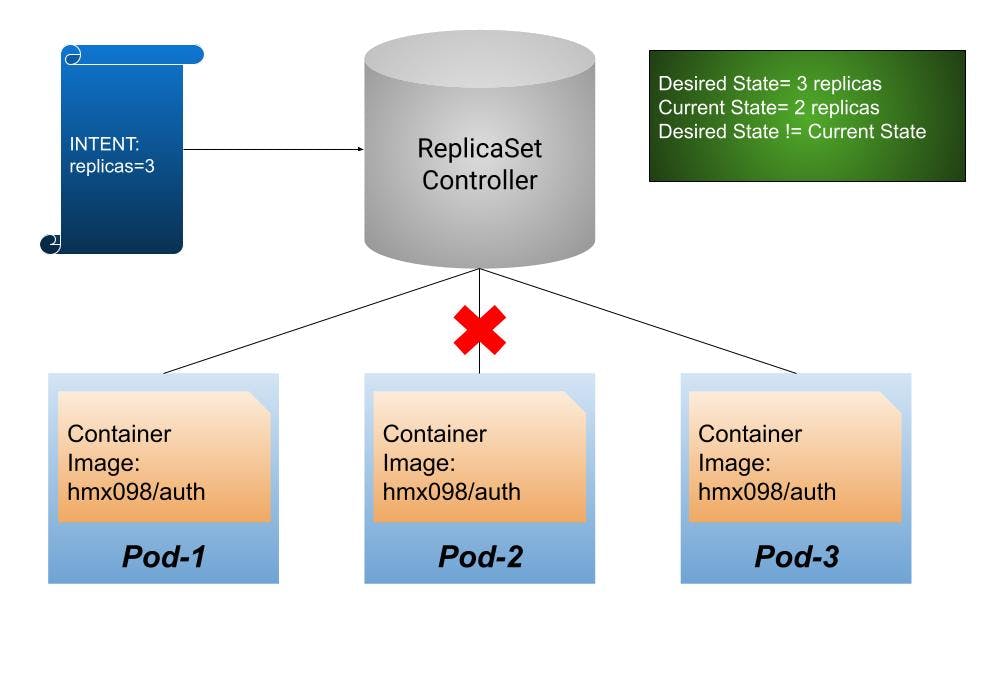
Self-Healing Action
Should You use ReplicaSets?
ReplicaSets can be used independently as Pod controllers but they only offer a limited set of features. A set of complementary features are provided by Deployments, the recommended controllers for the orchestration of Pods. A Deployment automatically creates a ReplicaSet, which then creates a Pod. There is no need to manage them separately, the Deployment will manage them on our behalf.
Deployments
Deployments are yet another improvement over Pods and ReplicaSets. The DeploymentController is part of the control plane node’s controller manager, and it ensures that the current state always matches the desired state. It allows seamless updates using various strategies, RollingUpdate which is the default, and another less-known Recreate. (Stay tuned for the next blog on Kubernetes Strategies)
Hands-on Example
apiVersion: apps/v1
kind: Deployment
metadata:
  name: nginx-deployment
  labels:
    app: nginx-deployment
spec:
  replicas: 3
  selector:
    matchLabels:
      app: nginx-deployment
  template:
    metadata:
      labels:
        app: nginx-deployment
    spec:
      containers:
      - name: nginx
        image: nginx:1.7.9
        ports:
        - containerPort: 80
spec This block defines the desired state of the Deployment object. In our example, we are requesting that 3 replicas, that is 3 instances of the Pod, are running at any given time.
Pods are created using the Pod Template defined in spec.template.
A nested object, such as the Pod being part of a Deployment, retains its metadata and spec and loses its apiVersion and kind- both being replaced by template.
spec.template.spec We define the desired state of the Pod. Our Pod creates a single container running the nginx:1.7.9 image
Creating a Deployment
Let us create this deployment. Save the above file as nginx.yaml . We can clearly see that Deployment uses ReplicaSets under the hood.
controlplane $ kubectl create -f nginx.yaml
deployment.apps/nginx-deployment created
controlplane $ kubectl get deploy,rs,po -l app=nginx-deployment
NAME                               READY   UP-TO-DATE   AVAILABLE   AGE
deployment.apps/nginx-deployment   3/3     3            3           26s

NAME                                          DESIRED   CURRENT   READY   AGE
replicaset.apps/nginx-deployment-6979c7df79   3         3         3       26s

NAME                                    READY   STATUS    RESTARTS   AGE
pod/nginx-deployment-6979c7df79-7p5xw   1/1     Running   0          26s
pod/nginx-deployment-6979c7df79-jvvc7   1/1     Running   0          26s
pod/nginx-deployment-6979c7df79-wdd5n   1/1     Running   0          26s
Kubernetes saves each state of deployment as Revisions. We can see all our revisions using the following commands:
controlplane $ kubectl rollout history deploy nginx-deployment
deployment.apps/nginx-deployment
REVISION  CHANGE-CAUSE
1         <none>
Performing a rolling update
Let us change the image nginx:1.7.1 to nginx:latest
controlplane $ kubectl set image deploy nginx-deployment nginx=nginx:latest
deployment.apps/nginx-deployment image updated
Let us describe our deployment. We can see that Kubernetes uses deployment-controller to create a new RepicaSet and manages scaling automatically which we would otherwise have to do manually.
controlplane $ kubectl describe deploy nginx-deployment
Name:                   nginx-deployment
Namespace:              default
CreationTimestamp:      Tue, 17 Jan 2023 17:00:14 +0000
Labels:                 app=nginx-deployment
Annotations:            deployment.kubernetes.io/revision: 2
Selector:               app=nginx-deployment
Replicas:               3 desired | 3 updated | 3 total | 3 available | 0 unavailable
StrategyType:           RollingUpdate
MinReadySeconds:        0
RollingUpdateStrategy:  25% max unavailable, 25% max surge
Pod Template:
  Labels:  app=nginx-deployment
  Containers:
   nginx:
    Image:        nginx:latest
    Port:         80/TCP
    Host Port:    0/TCP
    Environment:  <none>
    Mounts:       <none>
  Volumes:        <none>
Conditions:
  Type           Status  Reason
  ----           ------  ------
  Available      True    MinimumReplicasAvailable
  Progressing    True    NewReplicaSetAvailable
OldReplicaSets:  <none>
NewReplicaSet:   nginx-deployment-7554b6b5b5 (3/3 replicas created)
Events:
  Type    Reason             Age    From                   Message
  ----    ------             ----   ----                   -------
  Normal  ScalingReplicaSet  3m45s  deployment-controller  Scaled up replica set nginx-deployment-6979c7df79 to 3
  Normal  ScalingReplicaSet  59s    deployment-controller  Scaled up replica set nginx-deployment-7554b6b5b5 to 1
  Normal  ScalingReplicaSet  52s    deployment-controller  Scaled down replica set nginx-deployment-6979c7df79 to 2 from 3
  Normal  ScalingReplicaSet  52s    deployment-controller  Scaled up replica set nginx-deployment-7554b6b5b5 to 2 from 1
  Normal  ScalingReplicaSet  50s    deployment-controller  Scaled down replica set nginx-deployment-6979c7df79 to 1 from 2
  Normal  ScalingReplicaSet  50s    deployment-controller  Scaled up replica set nginx-deployment-7554b6b5b5 to 3 from 2
  Normal  ScalingReplicaSet  49s    deployment-controller  Scaled down replica set nginx-deployment-6979c7df79 to 0 from 1
Let us check our rollout history
controlplane $ kubectl rollout history deploy nginx-deploymentdeployment.apps/nginx-deployment
REVISION  CHANGE-CAUSE
1         <none>
2         <none>
Change image from nginx:latest to nginx:1.9.1 and list our rollout history. We see 3 revisions
controlplane $ kubectl rollout history deploy nginx-deployment
deployment.apps/nginx-deployment
REVISION  CHANGE-CAUSE
1         <none>
2         <none>
3         <none>
Rolling Back changes
Let us first describe how our Revision-1 looked like
controlplane $ kubectl rollout history deploy nginx-deployment --revision=1
deployment.apps/nginx-deployment with revision #1
Pod Template:
  Labels:       app=nginx-deployment
        pod-template-hash=6979c7df79
  Containers:
   nginx:
    Image:      nginx:1.7.9
    Port:       80/TCP
    Host Port:  0/TCP
    Environment:        <none>
    Mounts:     <none>
  Volumes:      <none>
We will be rolling back to nginx:1.7.1 from nginx:latest.
Let us do it and describe our deployment.
controlplane $ kubectl rollout undo deploy nginx-deployment --to-revision=1
deployment.apps/nginx-deployment rolled back

controlplane $ kubectl describe deploy nginx-deployment
Name:                   nginx-deployment
Namespace:              default
CreationTimestamp:      Tue, 17 Jan 2023 17:00:14 +0000
Labels:                 app=nginx-deployment
Annotations:            deployment.kubernetes.io/revision: 4
Selector:               app=nginx-deployment
Replicas:               3 desired | 3 updated | 3 total | 3 available | 0 unavailable
StrategyType:           RollingUpdate
MinReadySeconds:        0
RollingUpdateStrategy:  25% max unavailable, 25% max surge
Pod Template:
  Labels:  app=nginx-deployment
  Containers:
   nginx:
    Image:        nginx:1.7.9
    Port:         80/TCP
    Host Port:    0/TCP
    Environment:  <none>
    Mounts:       <none>
  Volumes:        <none>
Conditions:
  Type           Status  Reason
  ----           ------  ------
  Available      True    MinimumReplicasAvailable
  Progressing    True    NewReplicaSetAvailable
OldReplicaSets:  <none>
NewReplicaSet:   nginx-deployment-6979c7df79 (3/3 replicas created)
Events:
  Type    Reason             Age                From                   Message
  ----    ------             ----               ----                   -------
  Normal  ScalingReplicaSet  20m                deployment-controller  Scaled up replica set nginx-deployment-6979c7df79 to 3
  Normal  ScalingReplicaSet  17m                deployment-controller  Scaled up replica set nginx-deployment-7554b6b5b5 to 1
  Normal  ScalingReplicaSet  17m                deployment-controller  Scaled down replica set nginx-deployment-6979c7df79 to 2 from 3
  Normal  ScalingReplicaSet  17m                deployment-controller  Scaled up replica set nginx-deployment-7554b6b5b5 to 2 from 1
  Normal  ScalingReplicaSet  17m                deployment-controller  Scaled down replica set nginx-deployment-6979c7df79 to 1 from 2
  Normal  ScalingReplicaSet  17m                deployment-controller  Scaled up replica set nginx-deployment-7554b6b5b5 to 3 from 2
  Normal  ScalingReplicaSet  17m                deployment-controller  Scaled down replica set nginx-deployment-6979c7df79 to 0 from 1
  Normal  ScalingReplicaSet  6m41s              deployment-controller  Scaled up replica set nginx-deployment-64b4b49777 to 1
  Normal  ScalingReplicaSet  6m21s              deployment-controller  Scaled down replica set nginx-deployment-7554b6b5b5 to 2 from 3
  Normal  ScalingReplicaSet  6m21s              deployment-controller  Scaled up replica set nginx-deployment-64b4b49777 to 2 from 1
  Normal  ScalingReplicaSet  6m18s              deployment-controller  Scaled down replica set nginx-deployment-7554b6b5b5 to 1 from 2
  Normal  ScalingReplicaSet  6m18s              deployment-controller  Scaled up replica set nginx-deployment-64b4b49777 to 3 from 2
  Normal  ScalingReplicaSet  6m16s              deployment-controller  Scaled down replica set nginx-deployment-7554b6b5b5 to 0 from 1
  Normal  ScalingReplicaSet  27s                deployment-controller  Scaled up replica set nginx-deployment-6979c7df79 to 1 from 0
  Normal  ScalingReplicaSet  26s                deployment-controller  Scaled down replica set nginx-deployment-64b4b49777 to 2 from 3
  Normal  ScalingReplicaSet  26s                deployment-controller  Scaled up replica set nginx-deployment-6979c7df79 to 2 from 1
  Normal  ScalingReplicaSet  21s (x3 over 24s)  deployment-controller  (combined from similar events): Scaled down replica set nginx-deployment-64b4b49777 to 0 from 1
Notice that the original replica-set during revision 1 nginx-deployment-6979c7df79 is back as this state was recorded. Actually, no replicaset was deleted . It was just scaled down to 0 and recorded.
This can be verified using the following commands:
controlplane $ kubectl get rs -l app=nginx-deployment
NAME                          DESIRED   CURRENT   READY   AGE
nginx-deployment-64b4b49777   0         0         0       11m
nginx-deployment-6979c7df79   3         3         3       25m
nginx-deployment-7554b6b5b5   0         0         0       22m
DaemonSets
A DaemonSet is a controller that is designed to run a Pod in every node of the cluster. It resembles Deployments and ReplicaSets in operation with the difference that it ensures that all (or some) Nodes run a copy of a Pod. As nodes are added to the cluster, Pods are added to them. As nodes are removed from the cluster, those Pods are garbage collected. Deleting a DaemonSet will clean up the Pods it created.
Usecase Scenarios for DaemonSets
running a cluster storage daemon on every node.
running a logs collection daemon on every node.
running a node monitoring daemon on every node.
A Hands-On Example
Let us deploy a fluentd logging daemon on each node in our cluster with 3 Nodes. (1 control Plane, 2 Worker Nodes).
apiVersion: apps/v1
kind: DaemonSet
metadata:
  name: fluentd-agent
  labels:
    k8s-app: fluentd-agent
spec:
  selector:
    matchLabels:
      k8s-app: fluentd-agent
  template:
    metadata:
      labels:
        k8s-app: fluentd-agent
    spec:
      containers:
      - name: fluentd-agent
        image: quay.io/fluentd_elasticsearch/fluentd:v2.5.2
      terminationGracePeriodSeconds: 30
Let us try this on a 3-node Kubernetes cluster
[node3 ~]$ kubectl get nodes
NAME    STATUS   ROLES                  AGE     VERSION
node1   Ready    <none>                 31s     v1.20.1
node2   Ready    <none>                 42s     v1.20.1
node3   Ready    control-plane,master   2m43s   v1.20.1
Let us apply this daemonset on this cluster
[node3 ~]$ kubectl apply -f ds.yaml
daemonset.apps/fluentd-agent created
Let us list the running pods. We can observe that we have achieved a fluentd-agent pod on each node.
node3 ~]$ kubectl get pods -o wide
NAME                  READY   STATUS              RESTARTS   AGE   IP         NODE    NOMINATED NODE   READINESS GATES
fluentd-agent-9m76v   0/1     ContainerCreating   0          15s   <none>     node2   <none>           <none>
fluentd-agent-qtqw5   1/1     Running             0          15s   10.5.2.7   node1   <none>           <none>
Let us list the daemonsets
[node3 ~]$ kubectl get daemonset.apps
NAME            DESIRED   CURRENT   READY   UP-TO-DATE   AVAILABLE   NODE SELECTOR   AGE
fluentd-agent   2         2         1       2            1           <none>          2m53s
Services
Services in itself are a vast topic to cover in this blog. Here I am only giving a small intro to what they are. Stay tuned for my future blog on Services and their types in Kubernetes. (🤓 Blog Promotion Intended)
In Kubernetes, we need to expose our services to the outside world to consume, and to achieve this we need to set up a mechanism to first expose a container’s ports to the cluster network and not just the Pod’s network. Given the complexity of Kubernetes’ Networking model, it will require a lot of effort because we need a complex setup of kube-proxy, cluster DNS server, etc, all collectively implementing a micro-load balancing mechanism. This is achieved via Services that take all the pain of exposing a container inside a Pod, inside a Node to the whole cluster, and then to the outside world if desired.
The benefits of the Kubernetes Service become more obvious when exposing a multi-replica application when multiple containers running the same image need to expose the same port.
Types of Services offered by Kubernetes
There are various types of services available:
NodePort
LoadBalancer
ClusterIP
There are also various mechanisms such as Ingress, Custom Service Load Balancers, etc. too which we will discuss in further blogs.